720.00 USD
750.00 USD


SKU : DL103
| Price |
550.00 USD 600.00 USD (-8%) |
| Quantity to buy | |
| Total | 550.00 USD |
Do not have enough stock
Out of stock
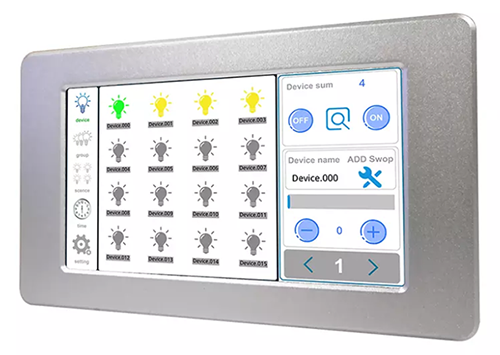
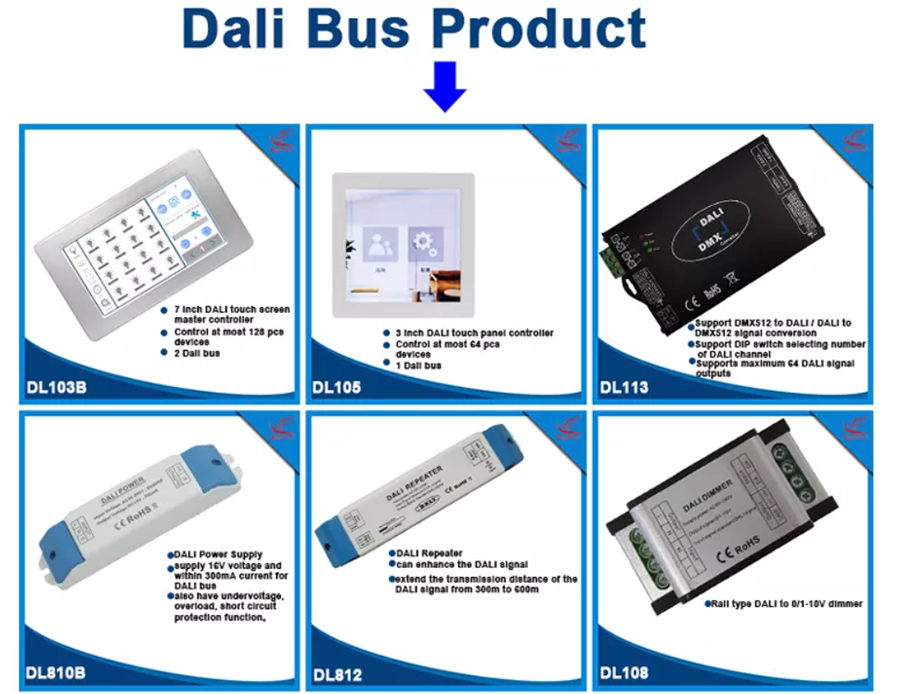
Lights Controller Management System Dali Master Dimmers
DALI Touch Screen Panel Controller for DALI Lighting Equipment
Essential details
หมายเหตุ : สินค้ารายการนี้ มีศูนย์ บริการในประเทศ,มีอะไหล่เครื่องราคาส่งพร้อมช่างผู้ชำนาญ มีบริการติดตั้ง ฟรี สอนการใช้งานฟรี และให้คำแนะนำกรณีมีช่างติดตั้งเอง จัดส่งถึงมือลูกค้าก่อนชำระเงิน ค่าจัดส่งค่าใช้จ่ายอัตตราของผู้ให้บริการรายต่างๆ ตามบิล สำหรับร้านค้าและช่างมีราคา พิเศษ ร้านค้าหรือช่างสามารถสมัครสมาชิกสะสมแต้ม เพื่อแลกของรางวัลได้ที่หน้าเวปไซด์ มีของรางวัลหลายรายการ ( สินค้านี้ซื้อ 1 ระบบ ขึ้นไป ส่งฟรี ) รับตัวแทนจำหน่าย ฟรีข้อมูลสินค้า รับสอนประกอบและตรวจซ่อมฟรี ในเวลารับประกัน 2 ปี / ไม่มีค่าใช้จ่าย / มีอะไหล่และเครื่องมือในราคาช่าง / มีบริการปรับปรุง ระบบงานเพื่อให้มีประสิทธิภาพในการประหยัดพลังงาน ให้ระบบทำงานเพื่อเพิ่มประสิทธิภาพลดการซ่อมยึดอายุการใช้งาน สินค้านี้ขายโครงการหรือร้านค้าในราคาส่ง ราคาที่เสนอต่อ ชิ้น ราคาที่เสนอยังไม่รวมภาษีมูลค่าเพิ่ม และสัญญาบริการอื่นๆ ตามใบเสนอราคา สินค้านี้ต้องตรวจสอบล่าสุดก่อนส่งถึงมือผู้ใช้งานตามมาตรฐานของผู้ผลิตเพื่อลดปัญหาการเสื่อมคุณภาพจากการจัดเก็บที่ไม่ถูกต้องเป็นเวลานาน
สรุปรายละเอียด |
Summarization |
|
|
พารามิเตอร์ทางเทคนิค |
Technical parameters |
|
|
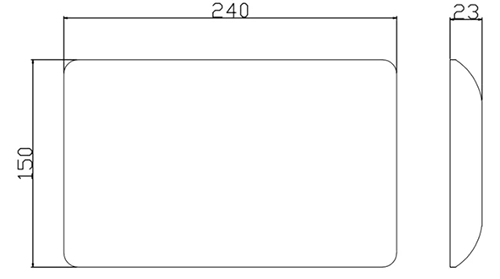
ขนาดหน้าจอสัมผัสภายนอก |
Touch Screen external Dimesion |
 |
 |
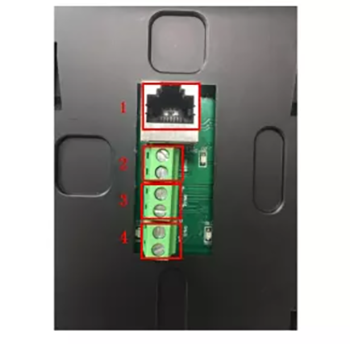
วิธีการเชื่อมต่อ / Interface instructions |
|
|
1. Network Interface / ช่องต่อการสื่อสาร RJ-45 2. Power supply DC.12V Power Interface / ช่องจ่ายไฟ 12โวลท์ สำหรับเครื่อง 3.DALI 1 Interface / ช่องสัญญาณ DALI ที่ 1 4.DALI 2 Interface / ช่องสัญญาณ DALI ที่ 2 |
 |
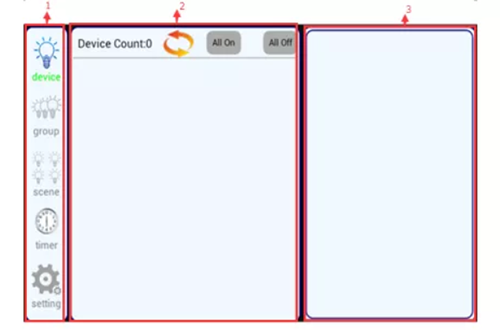
AS showed in figure 1, this system was devided into 3 areas as follows: |
Introduction for software function |
 |
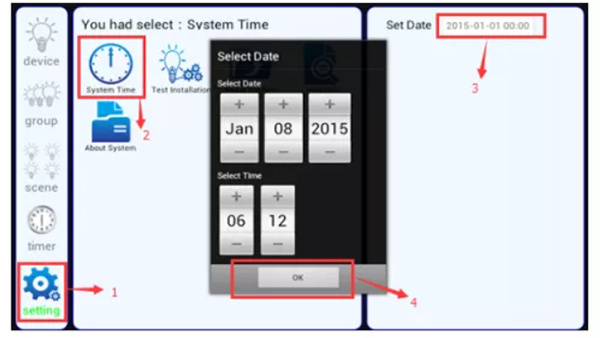 |
The steps for setting the time is showed as figure 2 : Click the setting button in system menu, then, you will see 5 pieces setting information, click system time(number 2 showed in figure 2) to enter time setting interface. There will pop-up the dialog box,click “ok” after you modify the time, you’ve finished the modification. |
|
คลิกเวลาระบบ (หมายเลข 2 แสดงในรูปที่ 2) เพื่อเข้าสู่อินเทอร์เฟซการตั้งค่าเวลา จะมีกล่องโต้ตอบปรากฏขึ้น คลิก “ตกลง” หลังจากที่คุณแก้ไขเวลา แสดงว่าคุณแก้ไขเสร็จแล้ว |
|
คำแนะนำสำหรับระบบซอฟต์แวร์ |
Instruction for software system |
|
|
|
Note: the terminal devices is at most 128pcs. |
 |
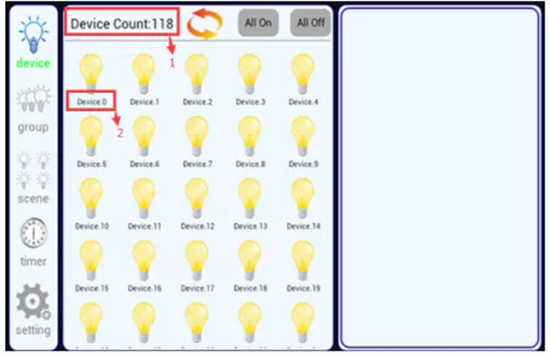 |
Note: the terminal devices is at most 128pcs.
|
|
![]()
![]()